
Authenticating with Hover's API
How to use your API credentials to authenticate with Hover's API
Hover's API supports OAuth 2.0. This authorization framework enables application to obtain programmatic access to HTTP services and APIs. Specifically, Hover supports the OAuth 2.0 Authorization Code Grant Type
This guide will demonstrate how to use your API credentials to generate an access token and use that access token to make API requests to Hover.
Before You Start
In order to make API requests to Hover, you will need a set of API credentials (Client ID and Client Secret). If you have not generated these credentials with Hover, please follow this tutorial to create a Hover integration and secure your credentials. You will need the following values before you can begin the authentication process:
- Client ID
- Client Secret
- Redirect URI
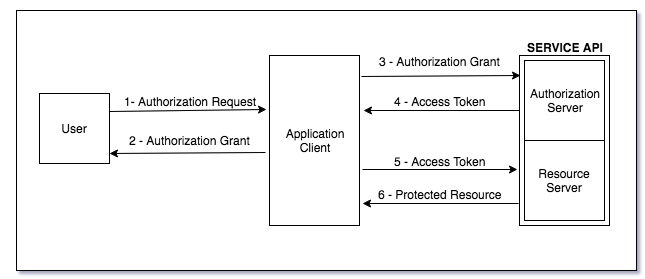
Understanding the Authorization Code Grant Type flow
The OAuth 2.0 Authorization Code Grant Type flow consists of the following steps. We will delve deeper into each step of this process, but here is the high level overview on how to authenticate with this flow:
- User Authentication: The client application (your integration) redirects the user to the authorization server for authentication and consent.
- User Consent: The user provides consent to the client application, granting it permission to access their resources.
- Authorization Code: After consent is granted, the authorization server returns an authorization code to the client based on the redirect URI value
- Token Exchange: The client application exchanges the authorization code for an access token and a refresh token.
Obtaining an Authorization Code
The first step in this flow is to obtain an authorization code. It's recommended that this request routes to a browser or Your integration needs to make a GET request to the /oauth/authorize endpoint with the following query parameters:
- Client ID -- your application's Client ID
- Redirect URI -- your application's redirect URI
response_type-- the value should be hardcoded tocodefor this request to work
Here's a sample request URL:
https://hover.to/oauth/authorize?response_type=code&redirect_uri=https://hover.to&client_id=123456789
A user of your integration will be sent to Hover to log in with their email/password credentials and grant your integration access to the organization in Hover that they belong to.
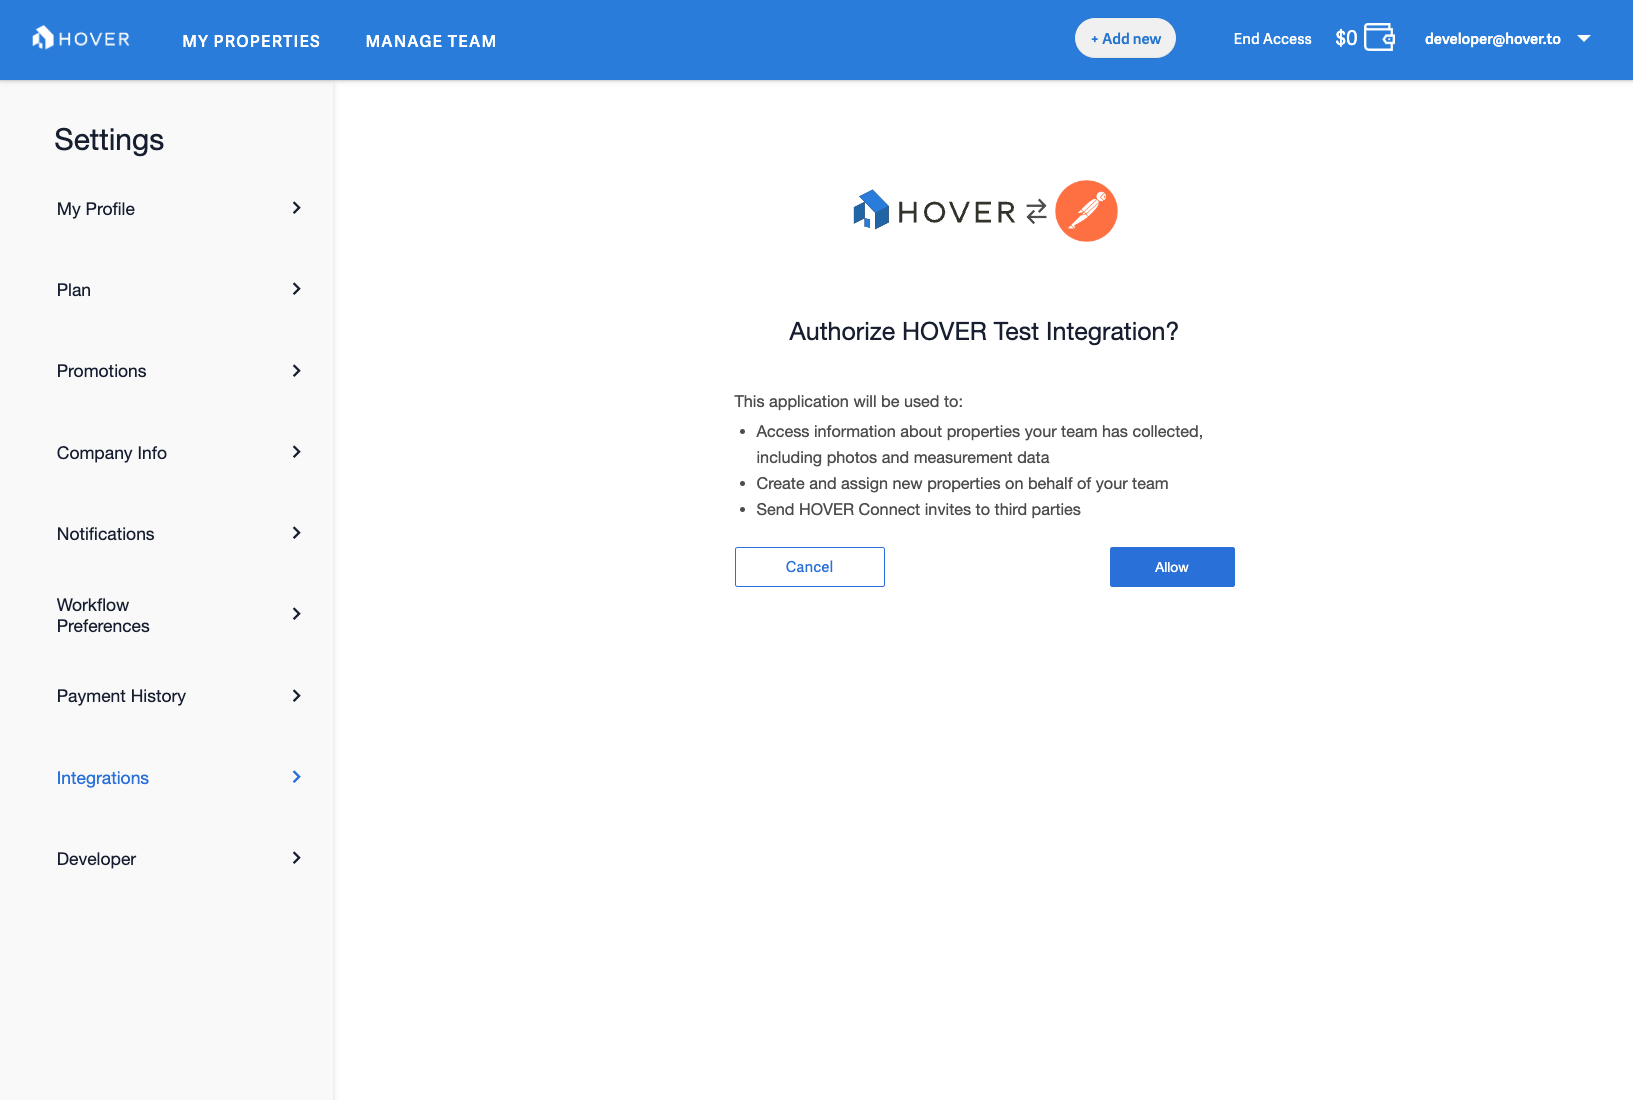
After a user grants app authorization (by clicking the Allow button), the authorization server will redirect the user back to your configured redirect_uri with the authorization code appended to the end as a query parameter. You can now save that authorization code value for the next step
For more information on obtaining an authorization code, please refer to our reference documentation for more details on this request.
Exchanging the Authorization Code for API Tokens
Now that you've successfully obtained an authorization code, we can make a POST request to the /oauth/token endpoint to obtain your access token and refresh token. This request takes
Note: It is recommended that you send these parameters as body parameters with the content-type set to either multipart/form-data or application/json.
client_id-- your application's Client ID valueclient_secret-- your application's Client Secret valueredirect_uri-- your application's redirect URI valuegrant_type-- set to the string value ofauthorization_codecode-- this value is the authorization code obtained in the previous step
Refreshing your API Tokens
An access token is valid for 2 hours and will need to be refreshed in order for subsequent API requests to Hover to work. This is the same API request to obtain the initial access token, but with slightly different parameters:
client_id-- your application's Client ID valueclient_secret-- your application's Client Secret valuegrant_type-- set to the string value ofrefresh_tokento indicate to Hover that you are refreshing your tokenrefresh_token-- this value should be your most recently-retrieved refresh token.
A successful request will yield a fresh pair of access/refresh tokens.
For more information on obtaining an access token or refreshing a token, please see our reference documentation.
Frequently Asked Questions
Can I automate the user authentication/consent process?
No -- in order to generate an authorization code, a user must manually allow the integration access to Hover's data on that user's behalf. Once the initial authorization code has been generated and exchanged for an access token and a refresh token, you can use the refresh tokens to generate new access tokens indefinitely. In other words, it's possible that a user only has to grant application authorization one time per Hover organization.
How long are access tokens and refresh tokens valid for?
An access token is valid for 2 hours. A refresh token is valid indefinitely, but invalidates when it is exchanged for a new access token/refresh token combination.
I am receiving a 401 Unauthorized error when trying to generate an access token or refresh my access token. What should I do?
401 Unauthorized error when trying to generate an access token or refresh my access token. What should I do?A 401 Unauthorized error could mean a number of things went wrong. For example, you could've tried to use an invalid refresh token to obtain a new access token or you had a malformed body parameter. In the case of a 401, you should double-check all of the parameters you are passing into your API request. If there are no glaring errors, it is recommended that you start the authorization code flow from the beginning (generating a new authorization code and exchanging it for a new access token/refresh token combination).
Updated 20 days ago